How to Sew a Sleep Mask with an Adjustable Strap
Sleep masks with an adjustable strap are a great option because they can fit almost any face. With this DIY project, I’ll show you how to sew your very own. In a previous blog post, I’d detailed how to sew a satin sleep mask with fabric covered straps, so you can check that out too.
In this tutorial, however, you will need some sliders to help you create the adjustable mask. It features step-by-step instructions, illustrative photos and a free pattern for the mask template.
I would categorise this sewing project as beginner friendly. I hope the tutorial helps you make sleep masks that help you sleep better and/or sew beautiful gifts for your loved ones. Let’s get started!
Sewing Supplies and Free Pattern Download
Pattern Template
Download the free pattern using the button below. Please don’t sell the pattern or redistribute it. You are free to sell any items made using this template.
Adjustable Sleep Mask Template (167 downloads )
Supplies
You will need the following supplies to sew this eye mask.

- Front piece – This can be any fabric you like
- Back piece – Use any fabric you like, but make sure it’s soft and comfortable against your skin since it will be in direct contact with your face.
- Batting – This is just a layer of cushioning. You could also use:
- Felt
- Sweatshirt fabric
- Any soft material that adds a bit of padding
- Elastic (52 cm or 20 in) Any firm elastic will work. I prefer bra strap elastic because it is more resistant to wear. I recommend using elastic wider than 10 mm wide for durability.
- Ring & slider or two sliders Your elastic width needs to match the hardware width. For example, if you’re using 12mm (½ inch) elastic, you need a 12mm ring and slider (or two sliders).
Fabric cutting
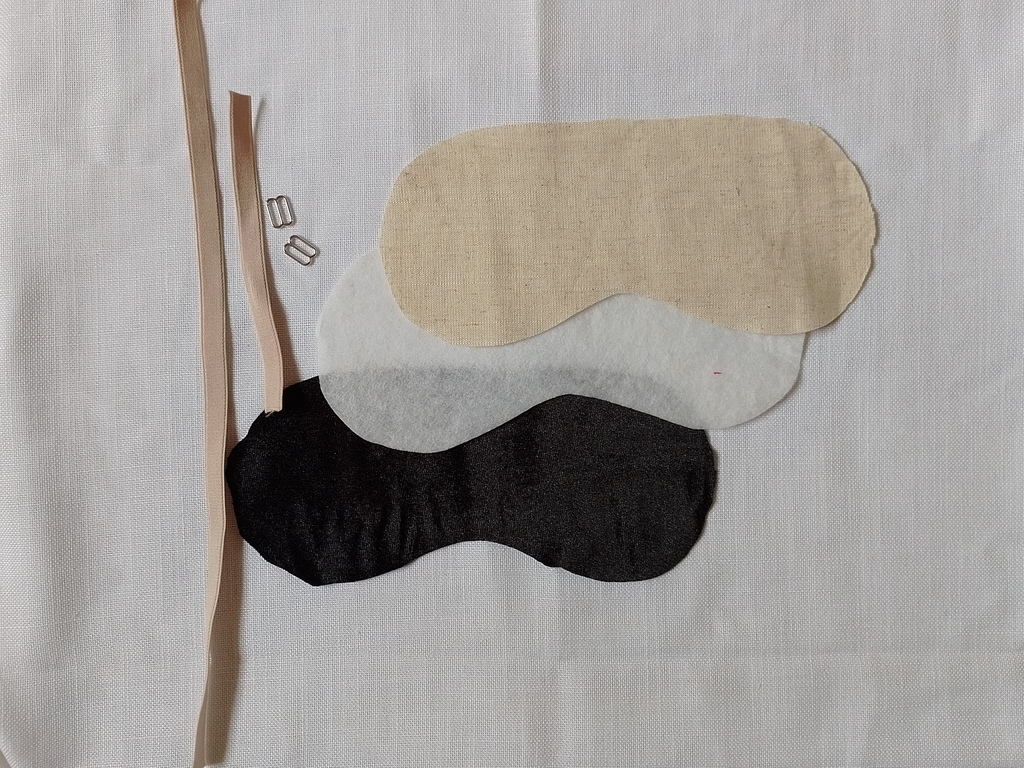
Check the test box on the pattern before cutting your fabric. Transfer the notches after cutting.
Using the provided template cut out:
- 1 front fabric piece
- 1 back fabric piece
- 1 piece of batting (or whatever cushioning layer you have).
Cut the elastic into two pieces:
- 36 cm (~ 14 inches)
- 16 cm (~ 6 ¼ inches)
Sewing Instructions
Let’s get into the sewing tutorial. Ps: I also made a short video to complement the written instructions. Written step by step instructions and photos are below the this video.
Step 1: Baste the front piece to the batting

Place the front piece of the sleep mask, right side up, on top of the batting.
Line up both pieces and pin or clip together.
Baste these two layers together about 3 mm or 1/8″ from the edge.


Step 2: Assembling the adjustable strap

Take the longer piece of elastic (36 cm/14 inches) and insert one end through both holes of the slider.
The motion is under the first hole, over the middle rod and into the remaining hole of the slider
If you’re using a textured strap, like decorative elastic or bra strap elastic, make sure that the middle rod of the slider is in contact with the plush side of the elastic.
Pull the elastic through just about 2 cm (¾ inch), fold it over and sew it down to the rest of the strap.

Take the other end of the elastic and insert with plush side up (if using two-textured elastic) into one hole of the second slider or into the ring.
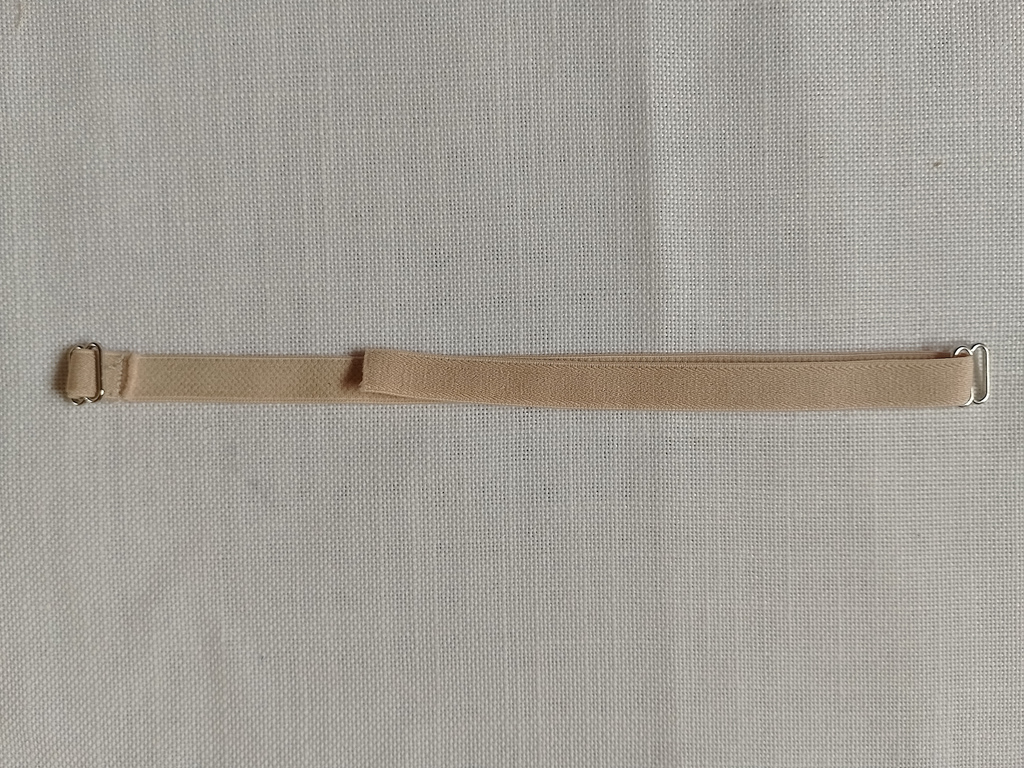
Now bring the elastic back through the two holes of first slider (right on top of the elastic there).
This time the plush side will be facing down (if using two-textured elastic). You’ve now created the first part of the adjustable strap.

Now loop the second shorter piece of elastic (16 cm/6 ¼ inches) through the remaining hole of the second slider or the ring. If using two-textured elastic, the plush is on the inside.


Align the ends of the elastic so they are even and sew them together so that they don’t move around. One line of stitching is enough or even a bar tack.
You now have an adjustable strap!
Step 3: Sewing the strap to the mask

Grab the mask front layer that you basted in Step 1. Place it right side up.
Now take your adjustable strap and place it on the mask wrong side up. Just to clarify, you want the side of the strap that has visible stitching to face you.
Now match the top edge of the straps to the notches you marked earlier.
Line up the ends of the strap with the edges of the mask and clip or pin the strap in place.
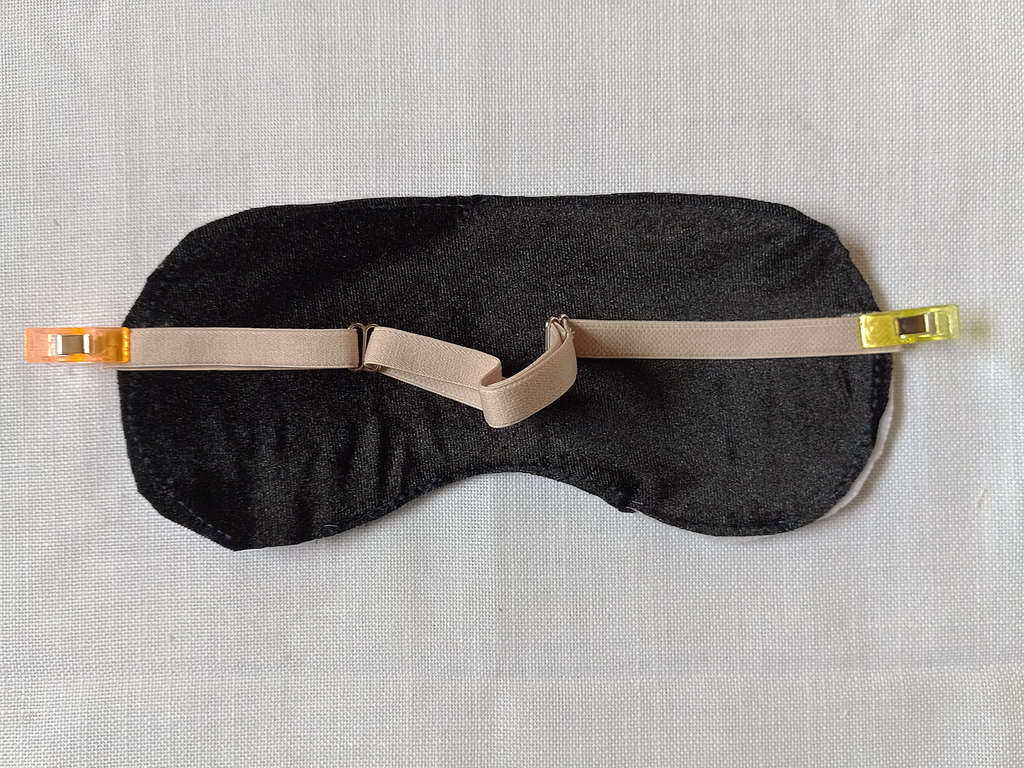
Sew the ends of the strap in place with a 3 mm or 1/8 in seam allowance.

Step 3: Assembling the mask
Take the back fabric piece and place it onto the front mask piece with the attached adjustable strap, right sides facing.
Basically, you are sandwiching the strap between the front mask and the back piece. This layer goes: Mask front, right side facing up. Mask back, right side facing down.
Pin the layers together, leaving a gap at the top about three fingers wide. This opening will be used later to turn the mask right side out.

Sew around the mask with a 6 mm or 1/4 in seam allowance, leaving a gap about three fingers wide at the top.

Make little snips into the seam allowance at the inner curve of the mask, just where the bridge of the nose goes.
Carefully cut small notches into the seam allowance of the outward-facing curves of the mask.

Reach into the mask through the gap and pull the strap out.

Carefully continue pulling the strap out and turn the mask right side out. Use a blunt pointy tool like a chopstick to push the seams out and smooth them.
Step 5: Finishing the mask

Fold the seam allowance at the gap inward and press using a pressing cloth. Press the rest of the mask.
You have two options to close the gap:
- Hand stitch with an invisible/ladder stitch. This is my preferred method
- You could also use your machine to topstitch around the entire mask.

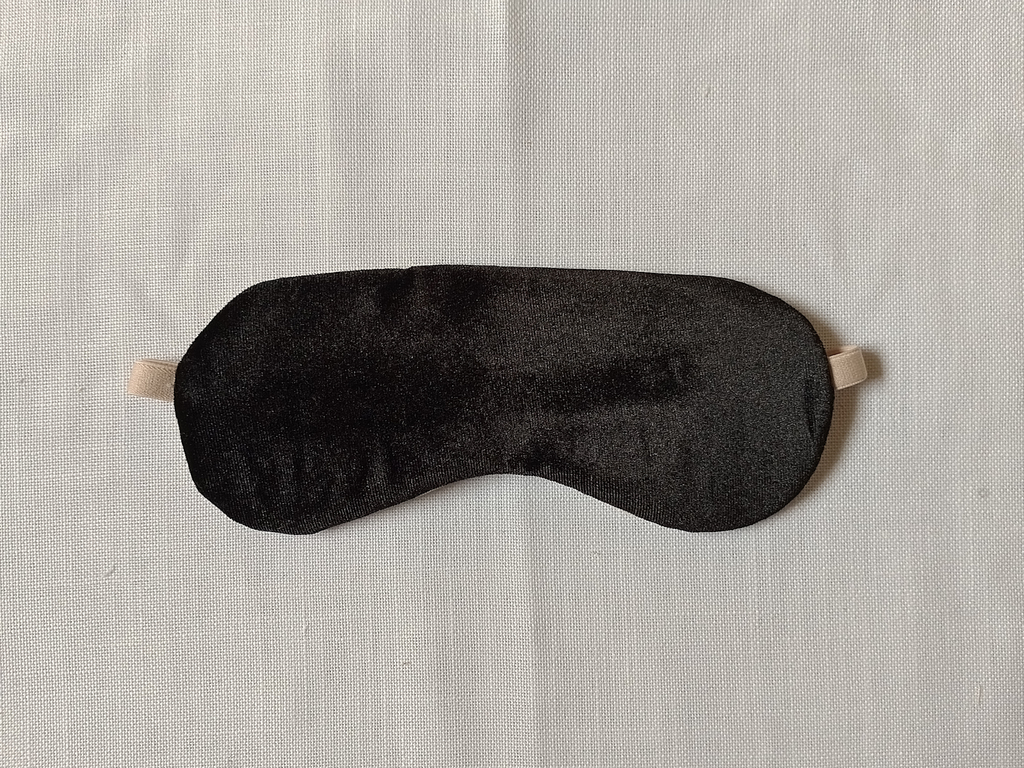
That’s it, you’re done! Congratulations on sewing a sleep mask with an adjustable strap. Let me know in the comments how it goes and don’t hesitate to reach out if you have any questions.
If you’d like more simple sewing tutorials like this, check out my resource page where I share free pattern templates and DIY tutorials for quick and easy sewing projects.